
HOW TO GET FREE VPN IN 2023!
Do you need a free VPN in 2023? are you tired of paying for one and need a free, effective and efficient virtual network that works 100% FREE? Then you are on the right path to getting your freedom on a VIRTUAL PRIVATE NETWORK (VPN).
VPN is a VIRTUAL PRIVATE NETWORKs that protect your information by hiding your device’s IP address and online identity, encrypting your data and routing it through secure networks to servers in far away states or even other countries depending on the server name / address used, thus, ensuring that you are able to browse the Internet securely and anonymously. Read more about VPNs
Now, I will guide you through STEP by STEP on how to get your free VPN using a Windows PC running on windows 10 / 11
Let’s get started:
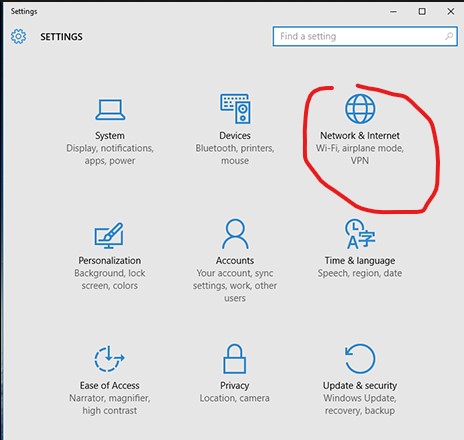
On your windows PC go to system setting, as seen in the image below and click on NETWORK & INTERNET, then VPN.
Now on the VPN Connection Page you are to select VPN Provider as Windows (Built-in) and fill in all other details as i will give to you and explain now as listed below.

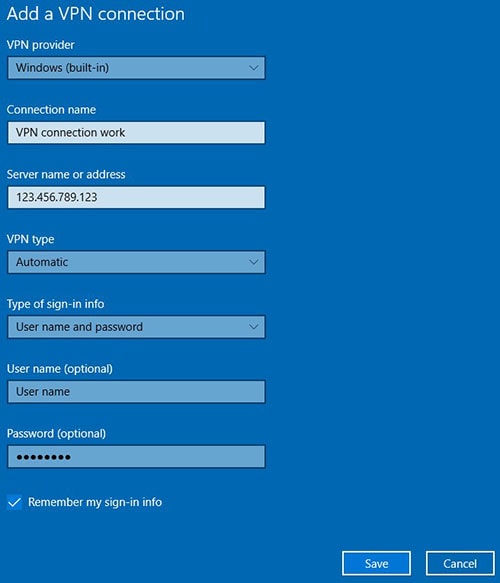
- VPN Provider : Windows (Built-in)
- Connection Name : Any Name as Desired.
For the other options, we will be using information gotten from a FREE VPN Provider; VPNBOOK follow link >>.
We will be using PPTP (point to point tunneling) since it is widely used and supported across all Microsoft Windows, Linux, Apple, Mobile and PS3 platforms. It is however easier to block and might not work if your ISP or government blocks the protocol. In that case you need to use OpenVPN, which is impossible to detect or block.
- Server name or address : depending on the desired location you want for your Virtual IP. For example USA: us1.vpnbook.com
as seen in the image below with other location’s servers/address. - VPN Type : PPTP (point to point tunneling). Click here to learn more about other types of VPN
- Type of Sign-in Info : Select User Name and Password
- Username (optional) & Password (optional) : for the username – vpnbook and password – z93cvfv as seen in the image below. However, this may change from time to time as provided by VPNBOOK
- Click SAVE
- Under the ADD A VPN CONNECTION, you will see the name created in STEP 2 above, click on it and select connect.


Pingback: เช่าห้องเก็บของ
Pingback: ทดลองเล่นสล็อต ฟรี
Pingback: ทดลองเล่นสล็อต ฟรี
Pingback: สล็อตเกาหลี
Pingback: link
Pingback: สล็อตแตกง่ายไม่มีขั้นต่ำ
Pingback: pgslot
Pingback: 30 mg ritalin
Pingback: เว็บบอลออนไลน์ ดูบอลสดฟรีทุกลีก ครบทุกแมตช์
Pingback: jaxx download
Pingback: zbet911
Pingback: โรงงานผลิตสายรัดพลาสติก
Pingback: house for sale hua hin
Pingback: ขายเศษผ้า
Pingback: จอ led ขนาดใหญ่
Pingback: ufa191
Pingback: endolift
Pingback: fortnite esp
Pingback: fortnite esp
Pingback: Buy browning sa 22 Online
Pingback: Sofwave
Pingback: Amanda Ghost
Pingback: กระดาษฉาก
Pingback: เช่ารถ alphard
Pingback: เว็บปั้มวิว
Pingback: big 666 สล็อต
Pingback: เทรดทอง
Pingback: eduzz account
Pingback: like it
Pingback: mondo grow kits
Pingback: ทัวร์ธุรกิจจีน
Pingback: พอตไฟฟ้า
Pingback: shroom chocolate packaging
Pingback: quik